
EZLOAD Quad-Load Belt for IPSC (Practical Shooting) and 3-Gun – Review
My name is Norbert, I am a French IPSC handgun shooter but beginner in the practical shotgun area.
As a newbie, I was obviously looking for some equipment…
First of all, which Division? Standard or Standard Manual?
Some of my fellow shooters had already decided to shoot in standard… and others in manual. So I was lucky enough to try both. I can say now that manual inspires me more but at that time I was puzzled.
In a financial point of view, there is a huge difference between manual and semi auto. And don’t forget that to compete you need more than a shotgun: chokes, magazine, spare parts, sights, belt rig etc…. But let say that when time comes to speak about gun, money is relative ;)
In addition I was screwed up too, because the first standard shotgun I shot with was a Taran Tactical M2…and believe me or not but after some shots my choice was done… till I found out the price. Money is relative up to a certain level ;) For sure, you get what you paid for, so smooth, accurate, light etc…but too expensive to me. Nevertheless, I put it in the back of my mind for the future….and bought some lottery tickets.
Thus, I made my choice over Manual, I was not only convinced by one of my shooting friend, Georges Marye equipped with a Remington 870, but by Vitaly Pedchenko too. With hindsight, I can say that standard manual is the most entertaining division, this is the core of the pratical shotgun as is Classic division, regarding pratical handgun shooting… So it was time to choose my shotgun.
“Googling” over the internet to find out some informations about practical shotgun, rem870.com appeared as the best reference. As you know, rem870.com is a wealth of informations regarding shotgun, and Vitaly has been really friendly enough to take time to answer questions and give advices. I would let you know that since few days a new website merged, this is http://www.practical-shotgun.com, great community of shooters too, highly recommended too! Very informative, lots of videos. You must add it to your favorites, considering that rem870.com was added first ;)
Thanks to Vitaly, I get all the good links to help me to choose my equipments. Let’s say that I managed to reach some top shooters too like Kim Leppanen, Jaakko Viitala, Josh Kenny, Magnus Gustafsson and some frenchies too like Christophe Marye (Georges’s father) and its team CCTB. He is the actual French Champion in standard manual! Before having my shotgun and even belt rig they were kind enough to lend me some equipments to be trained and to compete with them- thanks for that guys, you are awesome! To be honest, I was surprised how all these shooters were kind enough to answer to my basic questions. Practical handgun seems to be more locked….
So finally I got all informations to choose what would suit me the best.
So, regarding my shotgun itself, I finally bought a Benelli Supernova. In fact, not so many models are available, especially in France. Ie, it’s almost impossible to find a rem 870 nowadays. Long story short, it was really difficult for me to receive it, almost 4 months. Benelli in France is not so well depicted. But anyway, I got it and that the main thing. And let’s say I am quite satisfied. I equipped it with a Nordic components tube, to increase the magazine up to 12. Worked with my father on the forend to make 4 load easier (quite curious to write 4 loads easier….this reload is “painful”… lool), lots of job done on the trigger guard then on the loading port. Add an Easy hit Sight. Bought chokes, external chokes mainly (thanks to the best shop in Europe for sure, www.teuvolouhisola.fi, I have hardly ever encountered such a professional, friendly gunsmith). Plus some nice features like match saver, make some stippling on forend too… I can not say now if the job done is efficient, but I tried! For sure need improvement but will do it as I gain experience.
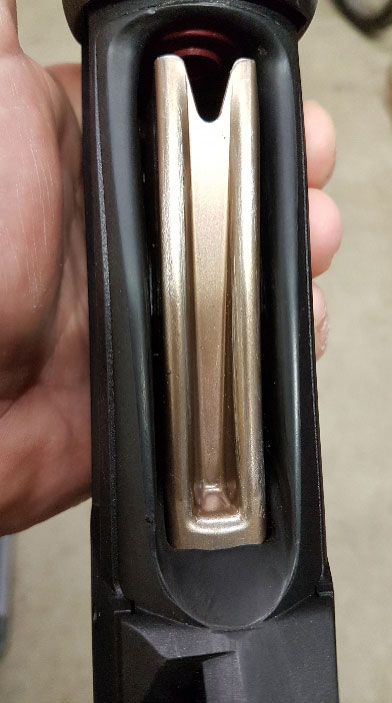
Benelli Supernova Opened Port
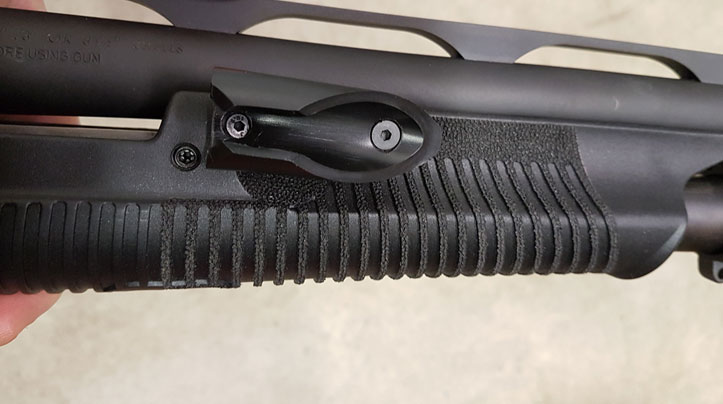
Benelli Supernova Stippled Forend
Which belt rig?
You have probably read the great review about belt rig done by Vitaly. (I translated it in French). So you know that many brands are available TACCOM, KING COMPETITION, EZLOAD are mainly the most used.
At the first sight, I was not at all interested in TACCOM.
To be honest I contacted both owner of KING and EZLOAD, I can say that all took time to answer me.
The bad thing, is that I am not a “compact dude”, I am 1.90m tall, 140kg, former tight head prop rugby player …so you can guess that I was looking for a very large belt.
Finally my choice was to go to EZLOAD. Magnus, the owner, was friendly enough to speak with me about a new version of his rig, which was at that time close to be released and even not yet displayed on its website. I am the first one to have a new version of this rig . He had even showed and sent me some upcoming release products….so I felt very confident. It was like we had already shot together.
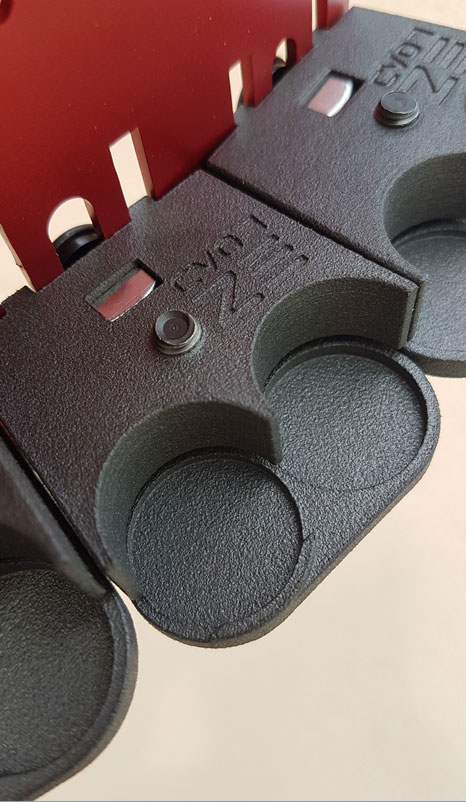
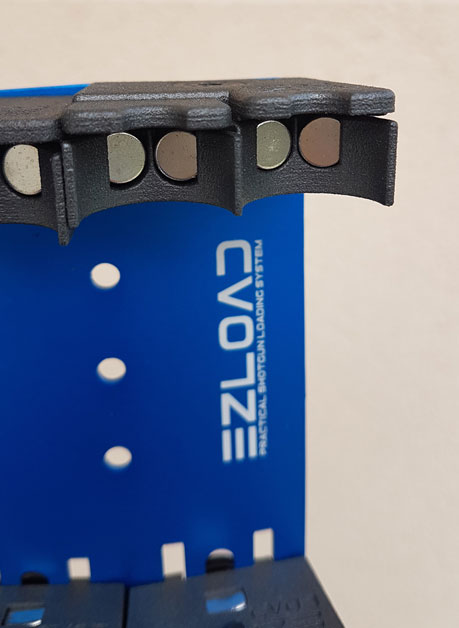
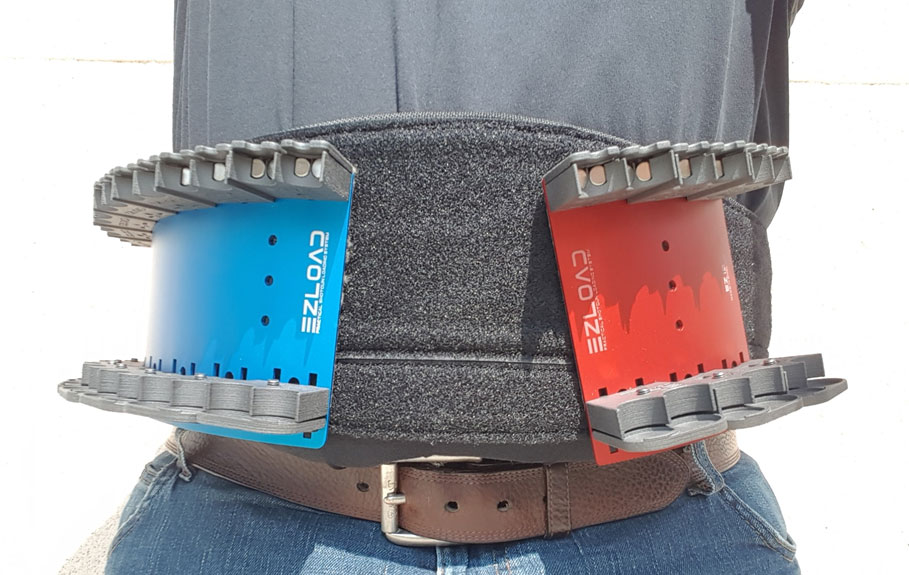
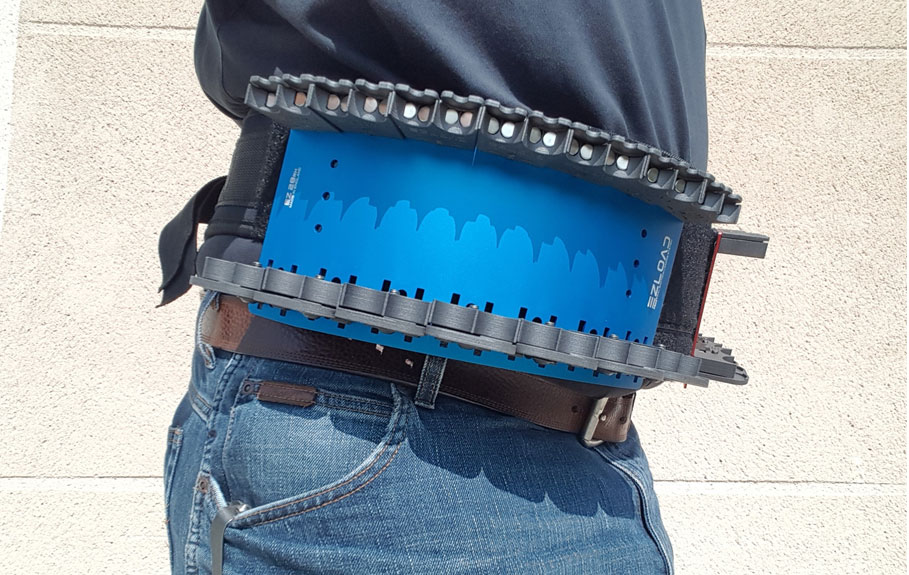
I went for a Velcro EZ belt (with extension….pretty boy I am ), and a competition rig 40 including one EZ28 shells rig (on right side) and EZ12 shells rig (on left side). On theses rigs, very strong magnets securely holds the shells in place.
So for these products, shells are not locked in place by pinching the brass, they are locked via magnets.
Each rig is available in 4, 8 ,12 ,20 ,28 shells version, for Right or Left hand. You can use either velcro or Tek-Lok belt attachments. As I told you I went for Velcro.
All you want to know about EZ is available on the website: http://www.ezload.co.uk
Order received!
First, I can say it’s always a good thing when you know that someone take care of your products. I like a lot the packaging done, no frills just something serious with the logo of the company.

EZload Belt BoxEZload Belt Box
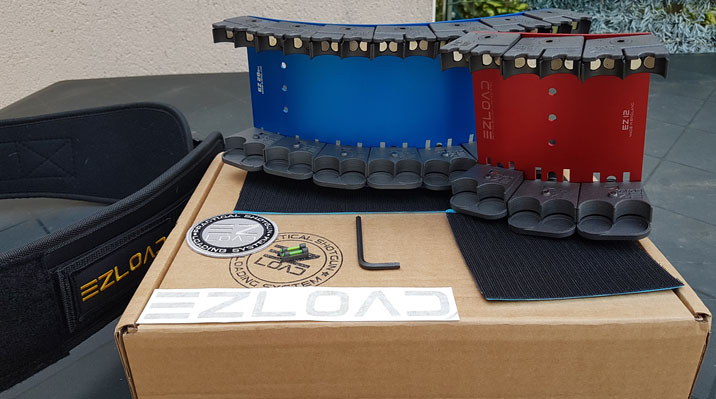
EZLOAD Quadload Rig
At opening, I was really impressed, by the quality of the products.
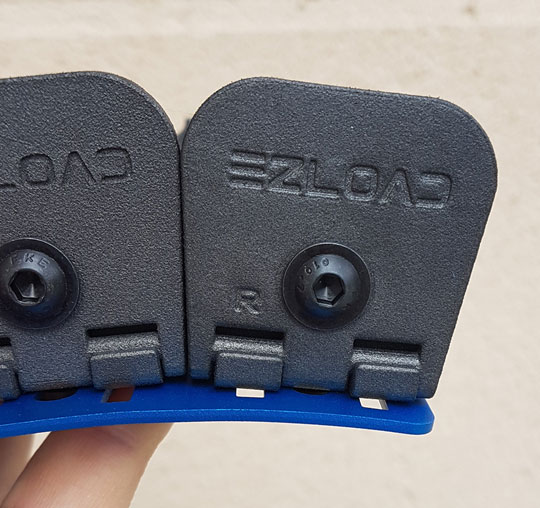
The plates are as asked, anodized in red and blue for fun. The thickness of the plates: 2mm, make you confident. So you are sure that theses will not bend if you grab shells not correctly. The shells are staggered in a continuous arc.
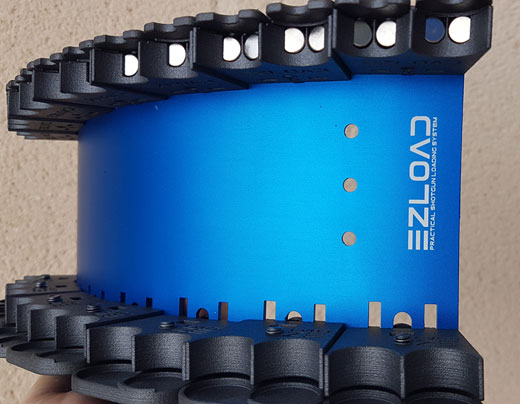
EZload Quadload Shell Holder
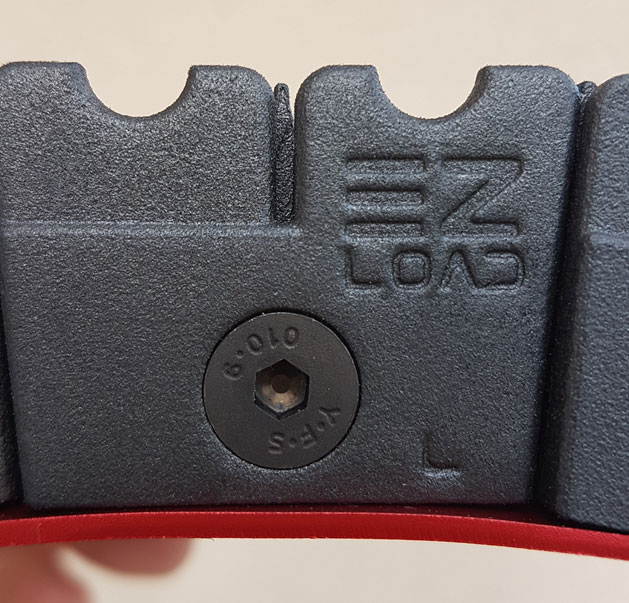
The shells holders are really strong, really rigid. I got confirmation from Magnus, it comes from the top end quality materials used (reinforced in Nylon). Nothing required to be done on them, everything is perfectly built, finished and displayed on the rig in a clever manner. I like the EZ logo printed on shells holders and the shell imprint on bottom holders too. Even a newbie like me can see it.
EZload Quadload Shell Holder
EZload Quadload Shell Holder
As for magnets, you certainly know that you can get some cheap magnet or some offering strong power….and let’s say that the magnets used by EZ are quite strong, and “in case of” 2 magnets are used per shell. It’s almost impossible to loose shells during explosive movements. But at the same time, they let you grab shells without efforts, the feeling is fluid if you see what I mean.
EZload Quadload Shell Holder with Magnets
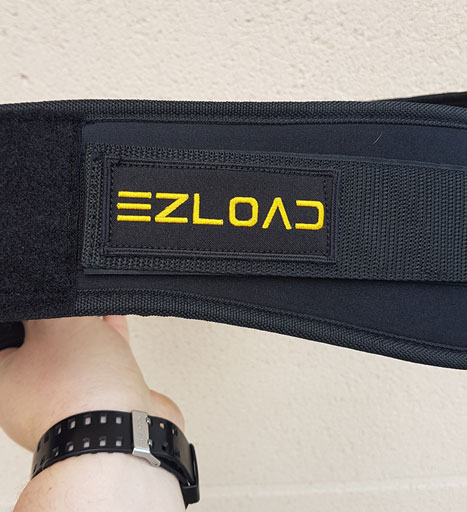
Regarding belt: it’s a high quality one, very comfortable, it looks like a large weightlifting belt so it will not move up during match if tightened correctly. Without extension, the belt used a roller buckler and Velcro closure. The extension is composed of a side squeeze release buckle, one side attached to the Velcro closure, the other side to the roller buckler. And so you just have to adjust the extension to fit your size.
EZload Belt
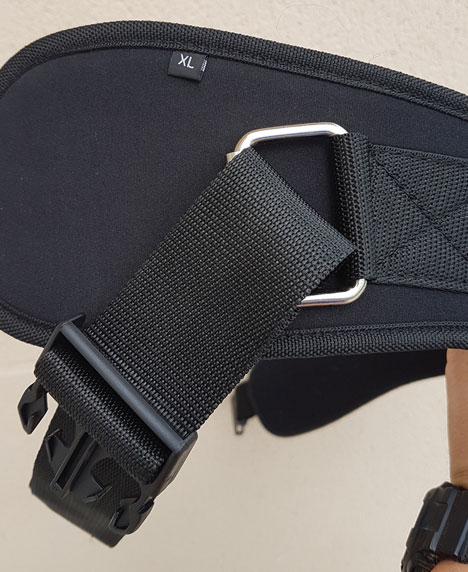
EZload Belt
EZ patch is displayed on the Velcro closure it and you have another one offered with your rig. That’s cool! In fact the belt is barely like an outer practical handgun belt and holds on thanks to Velcro. Velcro is used too to display the rigs as you want, with the bank angle you want and let’s say that the rig is strongly attached. Even if full of shells, you won’t loose it. No worries about this. This undisputed convenience allow you (if necessary) to not use some rigs in certain match configuration or simply to display shell in another way. So that’s very customizable. And more over, contrary to tek lock system, it’s possible to shoot on bended knee easier, simply because you can move up the belt, no need to keep it on waist.
So what’s new?
So not only I am the first one to buy plates with different colors, but I am the first one to use the new easier way to adjust holders to shells. So cool!!
In the former designed, for 4 shells, 4 screws were required to set up the shell holders correctly. So lots of screws and time wastes for big and small adjustment. So during a match, if you are this kind of shooter (like me) who has not the same shell length for birds, buck and slugs, you need to adjust your rig. Not so many time, but no choice to do it.
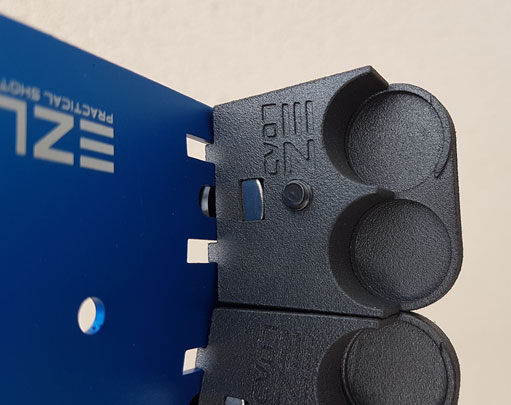
Now on the new version 2 larger screws for 4 shells… but honestly only 1 to work on ( at least as far as I am concerned). It makes things EZier for sure :)
2 shells holders are used to maintain 4 shells in position:
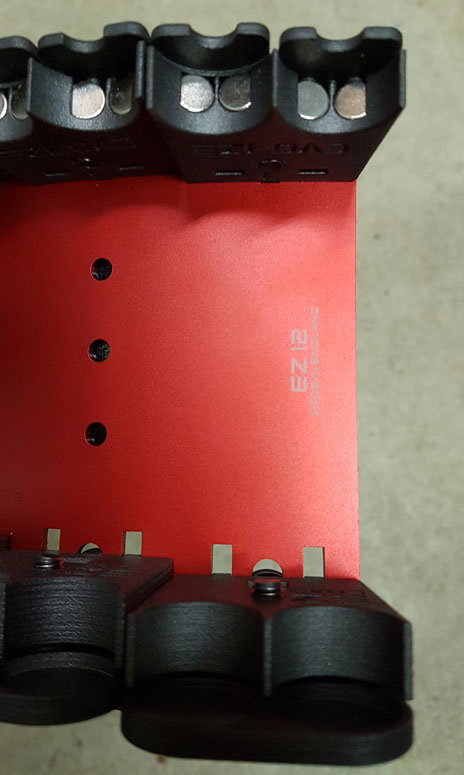
EZ12 EZload Shell Holder
-1 shell holder, at the top of the plate, can handle 2 shells by using strong magnets. Just to remind you that 2 magnets used per shells. No adjustment required here. (Former designed offering 2 screws to set it, now only 1…but this is adjusted by Magnus itself so no real need to work on)
-1 shell holder, at the bottom of the plate, can handle 2 shells too. This holder is adjustable. So in this holder there are 2 shell imprints and guide, so that you can position your shells on it. No magnets here, shells are not locked in position. Thus, thanks to a back screw (back to the plate – former designed was equipped with 2) by untighten it, you can move up or down this shell holder and so get a firm contact with the top shells (already hold in position via magnets on the top shells holder). Finally, shells are displayed 2 by 2 and allow to grab them either for a duo or quad loads.
EZLoad Quadload Shell Holder
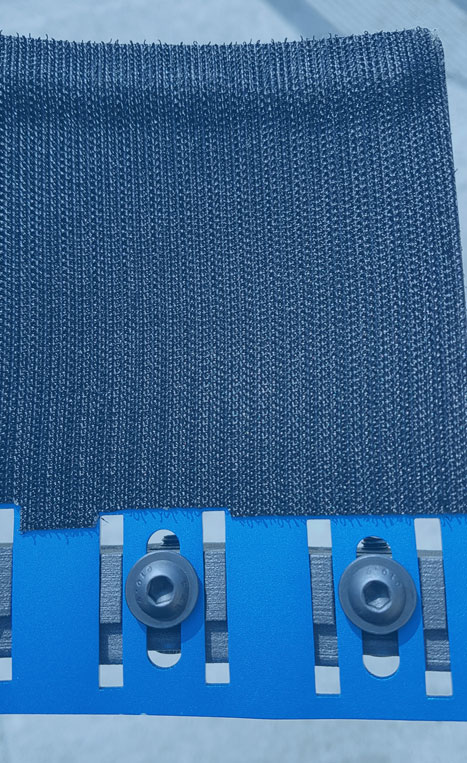
To be sure that new screws tighten enough, Magnus decided to use M4 screws and insert bolt so to maintain in position back shell holders on the plate. There is no way to tighten inside the holders itself. I like this detail a lot, it means that even if you spend your time to tighten, untighten you are sure to never worn the threads….and so don’t have to worry about this during match and make your more confident in your equipment. And obviously this is quite important to reduce stress. Same attention given to back screws, with plastic insert (washer) so you won’t tighten directly to the plate and scratch it :) Moreover no need to overtighten it, this is an M4 screw!
EZload Quadload Shell Holder
Another screws does exist for small adjustment. It means to give fine tuning of the strength of the contact between 2 vertical shells. When you grab 2 shells, you may want them to feel strongly connected or floaty a little bit. So this second screw helps you to fine adjust this feeling. I advise you to still remain with a firm contact to avoid loosing shells during your movement on a stage. So finally, you could change from one length to another without fine tuning, so only 1 screw adjustment may be required….quite fast. EZLOAD are very easy to adjust for different shell lengths!! And you can do it with only 1 Hex Allen Key, all screws (main, fine tuning etc…) have the same size….
EZload Quadload Shell Holder
Time to practice.
As a beginner, I am clearly not able to go in details, talking about efficiency would not sounds correct. So I prefer saying that, the first thing is to work on belt position: on waist vs belly ;) This not an obvious question to me, but finally and thanks to Magnus I found out that the upper position is the best one. I manage to come with a simple trick to be sure that your belt is tighten enough, because the rigs equipped with shells weight a lot. So, first try the belt with the Velcro closure lay out at its half neutral position. Then adjust the side squeeze release buckle so that the extension fit your need. Attached your belt rig with shells using main buckle extension and then fine adjust it by using only the Velcro closure, you just need to close it more.
Time to come to the most interesting part, I mean reload. Duo loads are easy, really! Very natural feeling. Your hand grab shells without any effort, no need to look at the rig to find out shells. So nothing to say about duo.
As for 4 loads, this is another story!! I know that practice will help to improve my skill and improve performances. But the most difficult is to find out how to grab? That’s difficult to know how to “break” (curve) your wrist to achieve the best grabbing position. Then how much hand strength is required to keep shells well aligned in your hand…where to position your thumb correctly?
In fact, repetition after repetition I managed to overcome 4-loads. For sure, I am still long, some shells fly around the room, but keep training is the solution. When I manage a 4 loads, I try another on in a row to confirm…but in fact it’s sounds more like a “lucky 4 loads” than due to my talent…LOL
The continuous arc formed by the shells holders give a very natural feeling around your body, and either you grab the first 2 shells or the last ones you feel the same. I mean you don’t need to bend yourself regarding which shells you need. This is a constant feeling.
Anyway, I feel more and more confident with the belt, I appreciate the fact that there is plenty of room between shells and plate, so for my big hand, I was never been annoyed by hitting the plate with my fingers at the grabbing time.
Later this week, I am going to Shotgun Cup, it will be my first level 3 match, I would be able to tell more as soon as I get back home ;)
EZload Quadload Rig
EZload Quadload Rig
New EZ items:
In introduction, I told you that Magnus spoke with me about new thing which I consider as a great improvement.
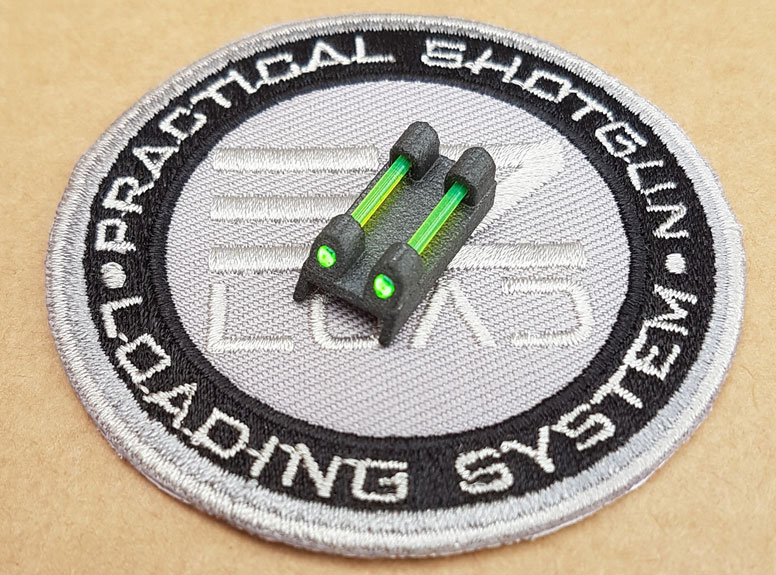
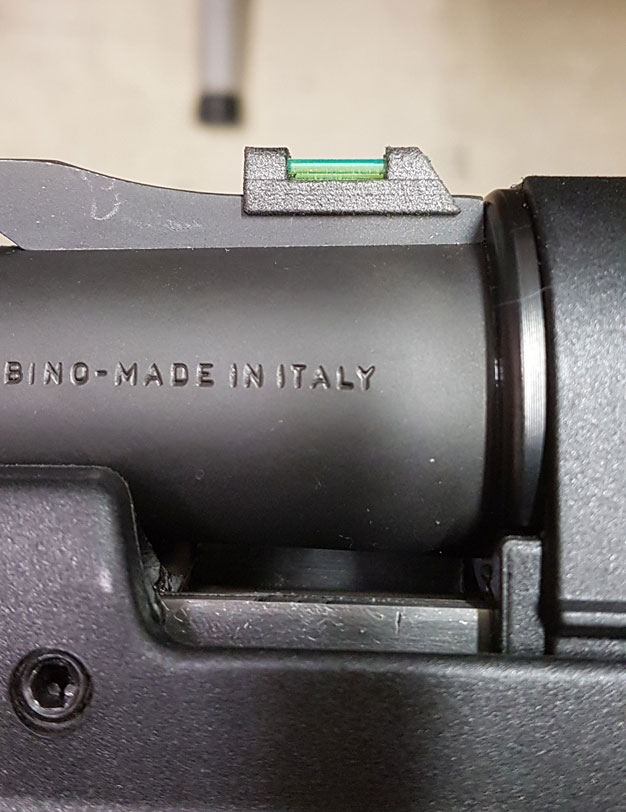
This is the “EZight” (don’t know if it’s the name but sounds cool to me). This is a 3D nylon printed front sight. Available with 2 colors of fibers red or green. This sight is just fixed on barrel with double sided tape. It was designed to fit perfectly the vent barrel of Supernova and M2, it means that you plug your sight on barrel, there are some 3D printed side to avoid it to rotate, so keep targeting on the right direction.
As rear sight I use red “Easy Hit” so for this front sight I decided to use green color. So it means that 3 dots aligned give you the right aiming, and by using 2 different colors it avoids any interference.
Firstly, on my Supernova, I used only double sided tape to fix it on vent barrel. And finally all my shots were too high. So by using 3M foam double sided tape, to move up a little bit the sight (1mm), I solve this issue, now I shoot what I aim.
This is an outstanding addition to my supernova, it helps a lot to be quick on target, very useful after a longue course of fire. And increase accuracy a lot with slug ammos. Highly recommended product so far!!
EZload Rear Shotgun Sight
Ezload Rear Shotgun Sight

EZload Rear Shotgun Sight
Hope you enjoy my first review shared on rem870.com. Time for me to pack everything for Shotgun Cup
Will try to come with more info soon, hope this helps!
Enjoy and stay safe!
where did you get the EZload Rear Shotgun Sight? I cant find it anywhere