
Benelli M2 Shotgun Modifications and Upgrades
Thanks to my friend Igor Lytvynenko for this article.
Greetings!
There are a lot of interesting articles in this blog, but there is not much information about the famous Benelli M2 shotgun. I want to fix this and share my experiences of using this beauty throughout several shooting seasons. I have used the Benelli M2 during 25 matches in Ukraine and abroad, so I have the knowledge to tell you about it.
But first, let me put a little disclaimer out there. This article is not for newbies and I won’t start describing how to prepare the Benelli M2 for practical shooting right out of the box. I am not going to describe upgrades, bells and whistles. Instead, I will describe the important elements of fine tuning, the problems I’ve found and the ways to fix them. Some of the issues are very typical and obvious but I will describe them anyway. Some of the issues are very interesting as well.
So, we’ll start with nuances and tips.
1. Front Sight
There was cloth which came in a sealed bag together with the front sight. The purpose of that 3M cloth is to degrease the vent rib before installing the sight. After this is done, you throw the cloth away immediately. It is hairy and it will leave particles on the vent rib. Just use a regular cotton cloth and degrease the place of installation with something you usually use. I decided to leave the factory sight to use it as a stop for the new EasyHit sight.
The second problem which I had with the new sight is that the adhesive strip was dry and not adhesive at all. You should just remove it and buy a 3M adhesive strip and use it to attach the sight to the vent rib.
Additionally, I used the duct tape to clamp the front sight and rib together for one day in order to apply pressure and allow the adhesive tape to stick better.
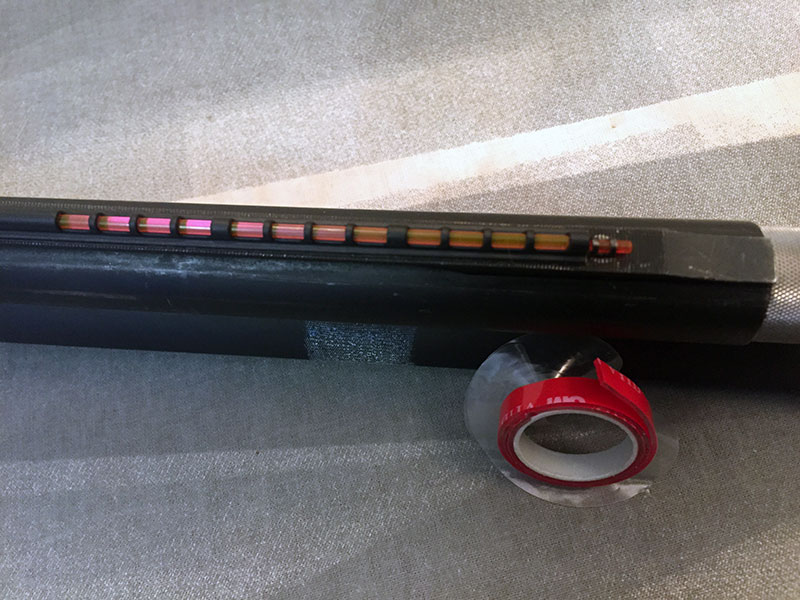
Front Sight and Adhesive Tape
2. Rear Sight
There is no rear sight on Benelli M2 as you know but it is pretty useful when shooting slugs.
Use glow paint (used in fishing) and apply it to the rear part of the vent rib.
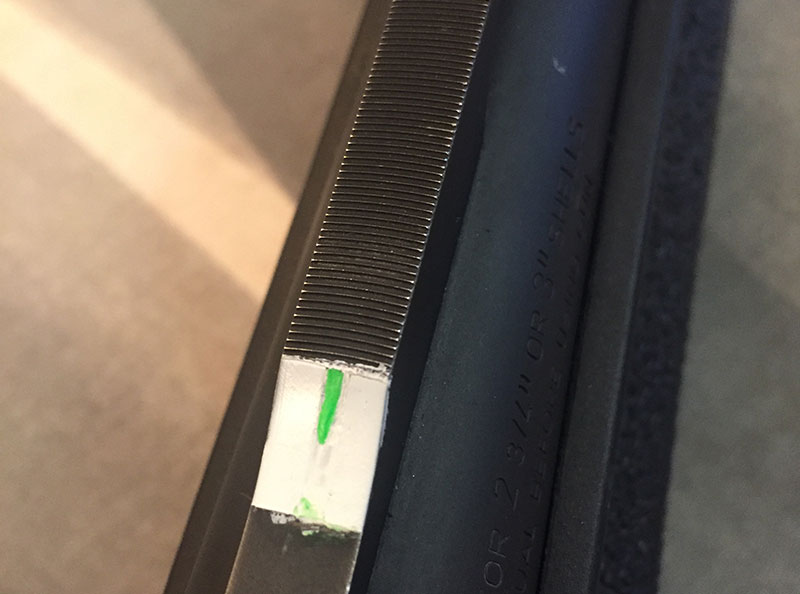
Painted Rear Side of the Vent Rib
It is better to have different colors for the front and rear sights because it will result in better aiming. My front sight is orange and my rear sight is white with a green line, for example. If you plan to paint the rear side of the vent rib with a paint color other than white, then you still need to paint it white for the background. That way, the color will be brighter. It is pretty easy to wipe the paint using a solvent.
3. Forend
The Forend of the Benelli M2 is loose from the beginning or it becomes loose with time. Some people don’t like it, while some think that it is a common thing for the Benelli M2.
Attach several stripes of the cotton fabric adhesive tape on the inside of the forend to get rid of the play.
You should use cotton fabric adhesive tape because the regular PVC adhesive plate will melt.
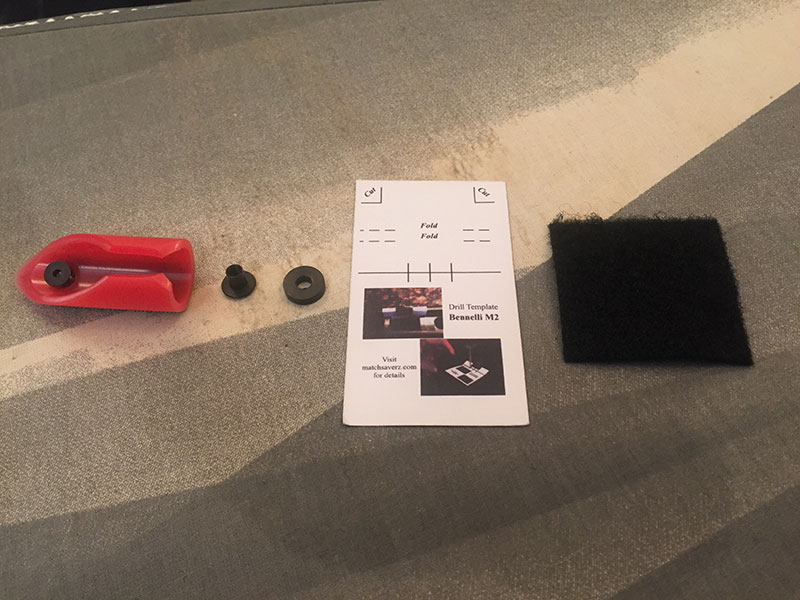
4. MatchSaverz
This is a very useful upgrade. It comes together with a template for the Benelli M2. You can put it on the forend, drill a hole and install it as designed by the manufacturer. I did it that way too. But I have found that the shotshell hits the receiver sometimes when you try to load it into the chamber. There is a small step between the receiver and forend that causes this to happen. And even long dry fire trainings could not guarantee 100% positive result.
That is why I want to share nuances and tips with you right away. I have located the Matchsaver close to the chamber. But the construction of the forend has not allowed me to install the nut on the bolt from the inside of the forend in order to attach a Matchsaver. I was able to solve it by the following way:
-Drilled a hole about two times smaller than the bolt in the forend and then tightened it in without the nut.
-The location of the Velcro, which is also used to attach a Matchsaver, has a pretty complicated form.
That is why I have used the 3M duct tape and made that place more or less flat.
Now I have a Matchsaver located as close to the ejection window as possible and there is no more problems loading a round into the chamber. Frankly, I was not sure if this was a reliable way by attaching the Matchsaver without a nut. However, the whole shooting season of 2016 has shown that it works well. I make sure the bolt is tightened regularly.
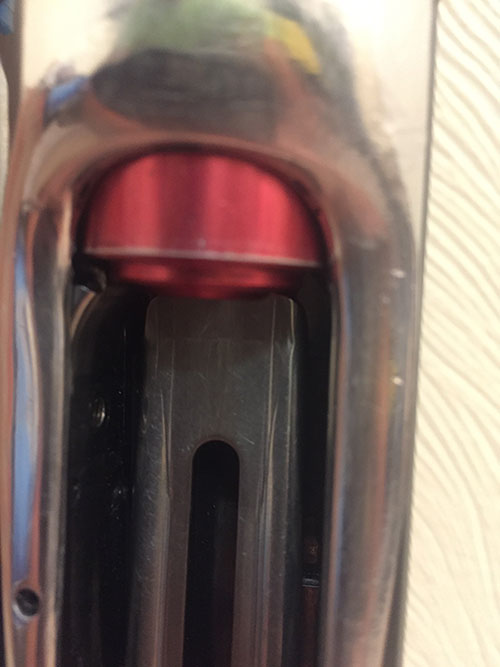
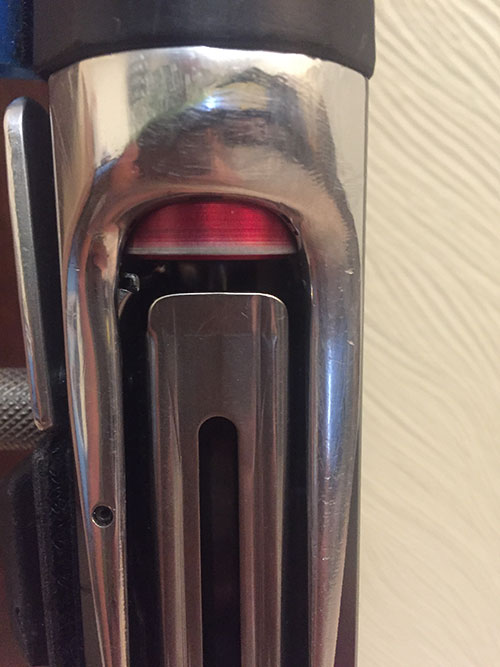
Matchsaver Location Comparison (Red by Manufacturer’s Instruction, Blue – My Version)
Matchsaver
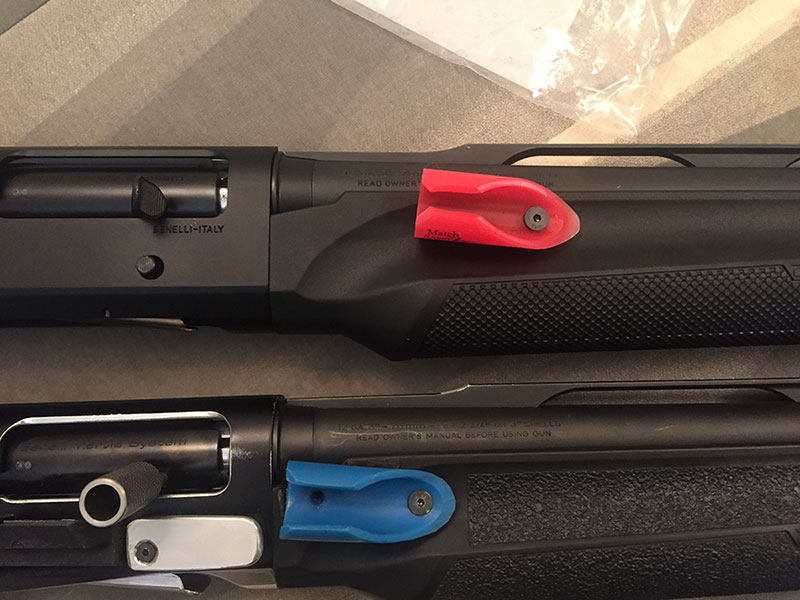
Matchsaver Location Comparison (Red by Manufacturer’s Instruction, Blue – My Version)
5. Oversized Bolt Release Button
There are few nuances with it but there is one that I can share with you. I will assume that you have your factory button drilled and tapped for installation of the oversized release button.
I have tried four oversized bolt release buttons for Benelli M2. but decided to use the 5th one. This was the one that I made myself from a piece of aluminum. I installed it using a screw with Loctite to make sure it wouldn’t get loose and that it stays in place.
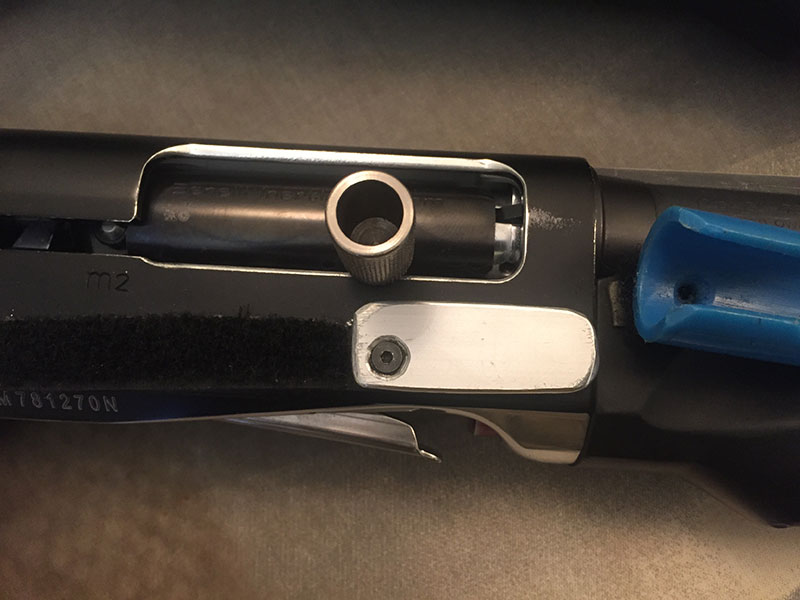
Oversized Bolt Release Button
Here is a tip: Make sure the lower end of the button doesn’t protrude past the loading window. Why is this important? Because you may accidentally activate it while loading ammunition and you will have a round on the carrier while still trying to load ammo into the magazine tube.
6. Trigger Group Pin
The pin fell off my friend’s shotgun during the match. It looked funny to the spectators but not to Dmitry. Why did this happen? The answer is simple: There was too much oil on the pin. All of the shooters from our squad were searching for the pin and we finally found it.
Tips and advices: Wipe the excess oil from the pin. You can attach a piece of duct tape from both sides to eliminate the possibility of it falling off.
Now, let’s talk about more serious problems.
7. Chokes.
Prehistory: I was in a match in Hungary in 2015 and there was a slug stage. Ceramic plates were hanging on a wire from about 20 meters above. I had shot all the ammo I had but couldn’t hit any of the 4 targets. The choke I was using was a Modified choke because the slug was a saboted slug which was smaller than the bore of the shotgun.
I decided to test slugs when I came home. The distance was 25 meters, and the shotgun was on a shooting rest. Of course, I had to do that before the match so I wouldn’t make mistakes. So, when I started shooting the same slug that I used in the match, the point of impact was about 30 centimeters to the 4 o’clock; far from the point of aim. I was shocked by the result and I started thinking about how to adjust the front sight but then someone recommended to me that I change the choke. Therefore, I replaced the Modified choke that I had with a new one. As a result, all the shots struck the center of the target. I don’t know what was wrong with the first choke which came together with a shotgun.
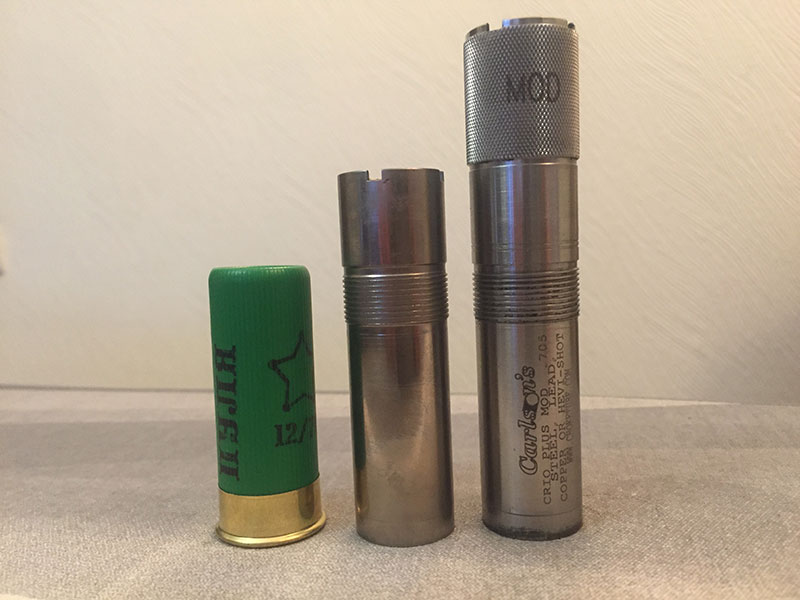
The ammo I used, factory choke, aftermarket Carlsons choke
Tips and advices: Chokes can influence accuracy dramatically. Don’t adjust your sights until you find out the real reason. Always test your ammo using your shotgun to avoid surprises. This is especially important for slugs.
8. Failure to Chamber
I had the following problem last winter: My shotgun failed to complete the operation and lock the bolt in place. It was impossible to make a shot and I had to hit the charging handle to lock the bolt in place.
I had cleaned and lubed the trigger group and bolt but that didn’t help. I tried changing the ammo but that didn’t help, though. Some shooters recommended visiting a gunsmith to modify a bolt. I was almost ready to go to a gunsmith but decided to change the recoil spring first, which is located inside of the stock. Disassembly for this purpose is pretty easy. However, the nut which you will need to unscrew it is tightened with some kind of Loctite on it. That is why you will need to heat the place to make it easier. I decided not to use Loctite during reassembly. I have replaced the recoil spring and lubed it using gun oil, allowing the chamber problem to be fixed. There was a lot of dirt in that unit.
Tips and advices: Have the unit cleaned. Otherwise, it may cause malfunctions such as failure to the chamber. I clean the piston and cylinder, and lube the recoil spring one time during shooting season. I didn’t have any problems after I started doing that.
Magazine Follower
I think it will be interesting for you.
Prehistory: I haven’t modified my shotgun for practical shooting myself. Instead, I gave it to a gunsmith. My friend ordered the same modification from the same gunsmith too.
During the process of the loading port modification, the gunsmith took out too much of the material from the magazine tube side. That caused the follower to stick out too far from the magazine tube and it caused the shell latch and carrier to lock. That caused the last round from the magazine tube to hang and fail to the chamber. This didn’t happen right after the modification, but rather in time.
The follower stop size was reduced too and that was the problem because you cannot make it bigger. The follower stop is located not in the easy to change magazine tube but on the receiver which is difficult and costly to replace.
This problem was difficult to solve but we found two ways to do that.
My friend Oleg attached PVC duct tape to the follower to make the diameter bigger. He even used it during the “Ukrainian Shotguns” competition without any problems. But that was just a temporary solution as you understand.
The solution which enabled him to fix that problem was using a follower from the XRAIL with the Browning A5 instead of with the Benelli M2. Why use the A5 follower? Because the factory Benelli M2 follower has a 23mm diameter and the Browning A5 follower has a diameter of 23.2mm. Those 0.2-mm fixed the problem.
Benelli Follower Stuck, Catches Carrier and Latch
Browning Follower, Works Properly
Benelli Follower Diameter:

Benelli Follower Diameter
XRAL Browning A5 Follower Diameter:
Benelli Follower Diameter
Be careful of experiments with self-made followers that are made of hard metal because they may damage the follower stop and you will have serious problems.
10. Shell latch
I had the following problem after the shot: Shotshell was hitting the edge of the latch which should have allowed it to pass through. That happened about one time in 10-15 shots. It also happened when I pushed the disconnector and the round was hitting the latch and it would not go to the carrier from the magazine tube.
No feed on start and during the stage.
When I was dry firing at home I had to manually align EACH of the dummy rounds to allow it to go out of the magazine tube.
The solution for this problem took a lot of time because this malfunction was difficult to find.
I have tried the following ways to fix this:
-Complete replacement of the trigger group. Didn’t help.
-Replacement of the shell latch, even several ones. Didn’t help.
-Bending of the shell latch. That caused the problem to stay but I experienced another one; the feeding of 3-4 rounds simultaneously.
When I tried replacing the shell latch, it looked like the problem was solved but it occurred again in 40-50 shots. I was able to replace the latch super-fast and I did that in less than 3 minutes :)
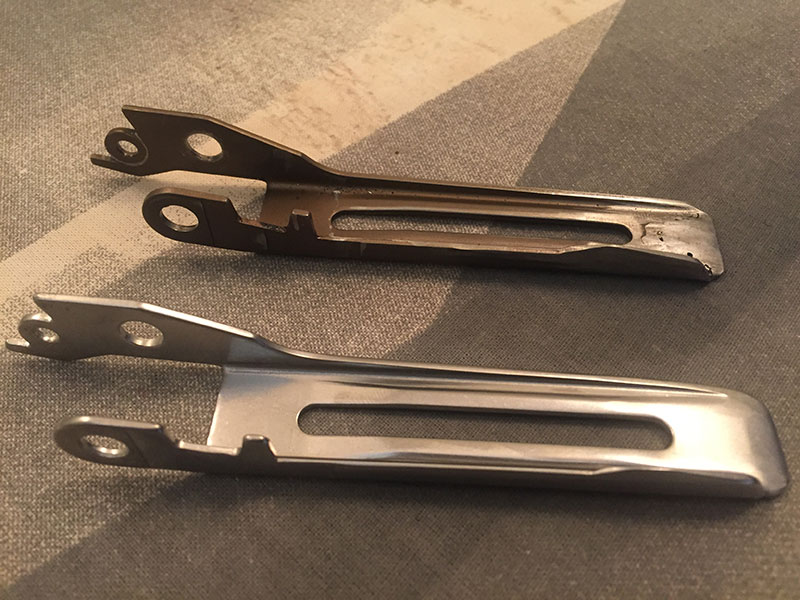
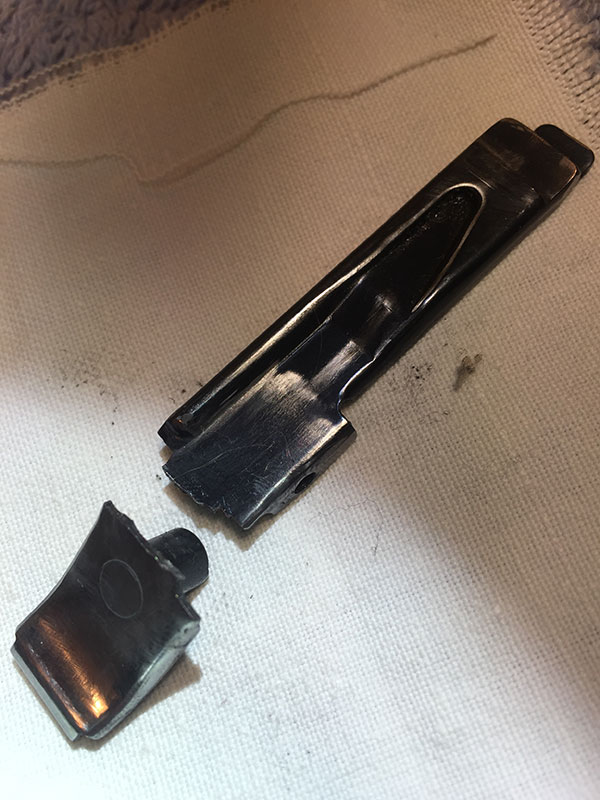
I was very upset because of that and didn’t know what to do. I was really happy to find the solution. That was the pin of the shell latch. When the gunsmith modified that loading window, he accidentally made the pin shorter. This caused one side of the pin to move out of the hole and the shell latch was not parallel to the receiver. The shotshell was hitting the side of the shell latch.
Short pin and regular pin:

Shell Latch Pins Comparison
Tips and advices: Now you understand that all parts are important.
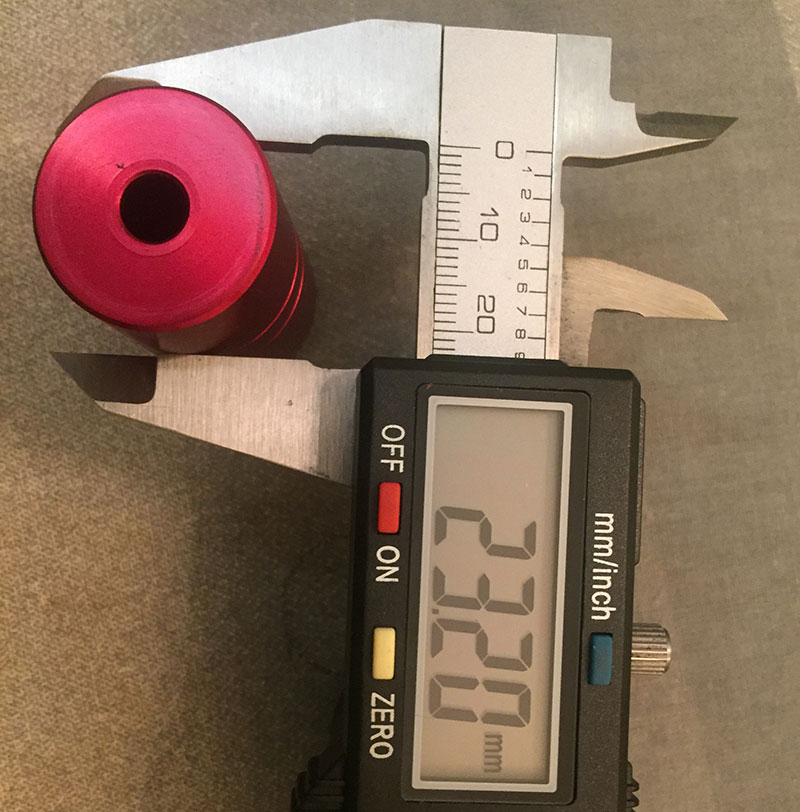
Another tip: The diameter of the bottom part of the dummy rounds becomes wider after heavy use. So, if you have malfunctions with dummy rounds, it doesn’t mean that you will have them on live rounds. Just measure the diameter of the dummy rounds and the live rounds:
Live round: 22,34 mm
Dummy round: 22,49 mm
11. Failure to enter the chamber (shotshell hits the right side of the chamber)
That problem was difficult to indentify. And it costed me a lot during the competitions. For example, I had 8 problems on the first day and zero problems on the second day of the 2-day shotgun competition in Hungary. I have lost a lot of time on stages.
That problem was difficult to identify and it cost me a lot during the competitions. For example, I had 8 problems on the first day and 0 problems on the second day of the 2-day shotgun competition in Hungary. I lost a lot of time on stages.
First of all, this problem is well known and it pretty common on Benelli M2 and Benelli Supernova shotguns.
There are two reasons for this problem. The extractor is made of the hardened metal. It polishes the place on the chamber where it enters, and this place becomes very sharp with time. The shotshell hits that place and it won’t slide into the chamber. It is pretty easy to fix, just polish the sharp edge. There are a lot of videos about this on YouTube. But, that method hasn’t helped me.
The shotshell was hitting the edge of the chamber with almost half of the diameter of the shotshell, and I had to search for another problem. The second problem is the worn out carrier. I had the modified factory carrier which made it easier to load rounds into a magazine tube. I have used this carrier for about 13,000 rounds and an unidentified number of dry fire trainings.
The replacement of the factory carrier for the Taran Tactical carrier fixed this problem. I made about 1,000 rounds without any problems.
I am not sure what happened to the old carrier. Here are the photos of the old and new carriers:
Carriers Comparison
Tips and advices: Carefully search for the problem, maybe one of your parts requires replacement.
12. Fail to eject the fired shell
That is pretty simple. First of all, thoroughly clean the place in the chamber where the extractor enters it. There is a lot of residue there. A copper brush is the best for that purpose. Replace the extractor spring. It settles down with time and the extractor works not as good as before.
I don’t think that photo with comparison of the spring will be useful, but here are the measurements:
New spring is 12.3 mm long
Old spring was 10.3 mm long
There was no need to replace the extractor. It is pretty reliable but I have a spare one.
Tips and advices: If you are replacing an extractor for the first time, note that the pin channel isn’t straight, and you are going to see just half of the pin.
Pin channel scheme:
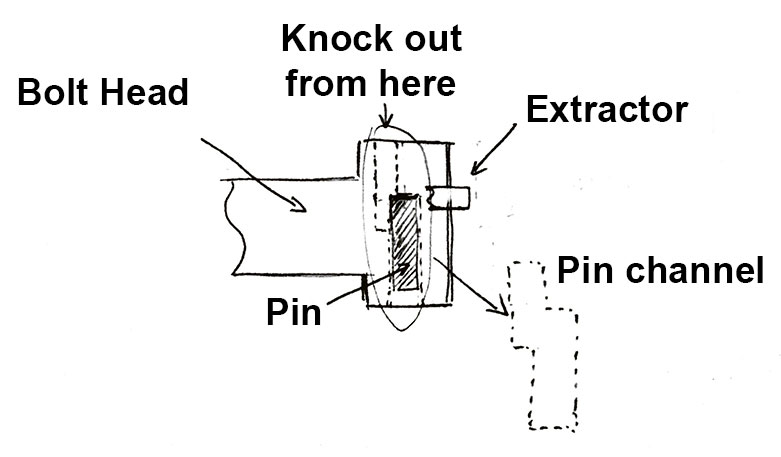
Pin channel scheme
13. Experiments. Carrier Latch
There is a well-known video about the preparation of the Benelli M2 shotgun for 3-Gun. One of the advisements in that video was to make deeper grooves on the latch to make loading easier. Here is a screenshot from that video:
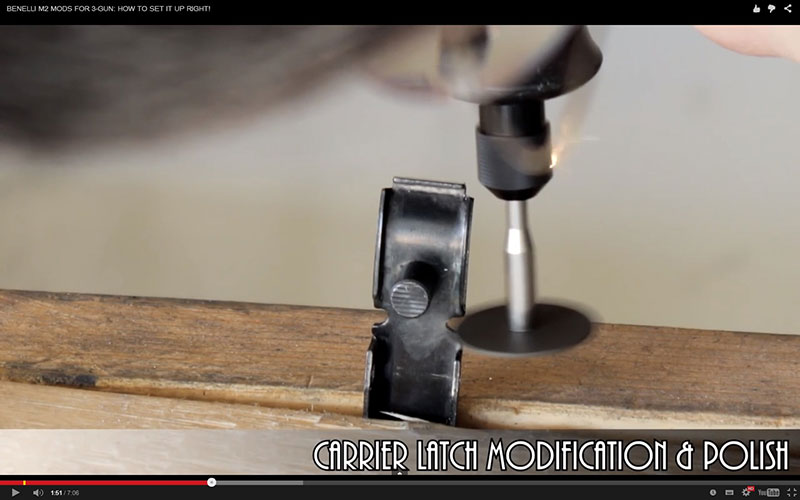
Carrier Latch Modification
I decided to do it the same way: Made grooves deeper for about 1 mm from each side. I haven’t noticed any significant improvement. The Modified latch lasted for about 2-3 months of dry fire trainings and then broke.
Broken Carrier Latch
Tips and advices: If you modify something, make sure that you have a spare part. In case with carrier latch the new spare one should be polished, drilled and tapped to be able to accept an oversized bolt release button.
That’s all my experience with the Benelli M2. The list of breakages and problems isn’t full and some shooters may experience completely different ones.
I hope that information from the article will be useful for you and will save you a lot of time and effort.
I plan to install the X-RAIL magazine and the modification of the loading port but I will leave that for the next article.
Important: The Benelli M2 shotgun is very reliable and all the problems described below are because of the user (which is the most often reason), because of inappropriate maintenance (the second most popular reason) or from wear and tear of the parts (pretty rare problem but it can happen).
The total number of rounds fired from my shotgun is 14,000 at the moment. Also, I dry fire a lot.
Bonus: You will find a list of spare parts below. Important! This list isn’t final and complete yet. This is just my personal list that I wanted to share with you:
Must have spare parts. The ones that I had broken in my shotgun.
1.1. Magazine spring (it will settle down with time)
1.2. Follower. Wears out with use, so it’s better to have a spare one.
1.3. Extended Carrier (Taran Tactical)
1.4. Carrier Latch
1.5. Carrier Latch Pin
1.6. Ejector Spring
1.7. Recoil Spring (inside the stock)
1.8. Recommend to have a spare charging handle. There were situations with broken or bended (when charging handle was too close to some of the walls and hit them). Choose which you like more.
Something that can brake but I didn’t have such malfunctions
Personally, I ordered almost all the springs that my shotgun has because I think that springs are not going to last forever.
And also:
2.1. Extractor
2.2. Firing pin. The rear part becomes deformed but I didn’t have problems with it. You may polish it regularly to avoid possible problems.
2.3. Firing pin spring. The factory one still works properly but I like to have a spare one.
2.4. Firing pin retaining pin. There is a rubber ring on it which is worn out but it still works properly.
2.5. Benelli C-clip. It is pretty small and easy to lose during disassembly. This set contains 5 clips.
2.6. Action lock lever spring. This spring is also small and easy to lose.
2.7. Breech bolt latch
2.8. Hammer spring
2.9. Trigger pin bushing
2.10. Trigger guard pin
2.11. Locking head pin. It is pretty deformed but still works properly. I decided to buy it to have a spare part.
I have nothing more to share :) Thanks for reading :)
Related post: Benelli M2 Shotgun Upgrades, Accessories and Modifications for 3-Gun and Practical Shooting
I’ve said it before and Ill say it again, WHAT A PEICE OF CRAP. Buy Made in The USA.
You have to be joking, or know nothing of firearms. The benelli M1 and M2 have been the gold standard for reliability in the semi-auto reahlm for years. There’s a reason why all the top 3-gunners use them.
I’ve owned 3 M1 S90. 12 gauge 1 ,3 gun & 2 defence .2 Berretta 12 gauges 1 ,1200 & 1
1301 police have enjoyed them all . H ave 1
Remington 870 love it also. Enjoy what U have .
Thank you for a great article and it is still very relevant!
I really appreciate your information posted. I run M2 in 3 gun and SBE II hunting and do gunsmithing on the side for 3 gun folks and I have used your post to help diagnose some modified M2 that were stumbling under competition use and it sure did get me on track to fix some minor issues. Thanks again for the article and let me say that Benelli is the “KING of 3 gun” and they can be hammered on hard and still run reliably using any ammo under all conditions.