
Removing Dimples on Remington 870 Magazine Tube
Shotguns are powerful and versatile weapons but they have very limited magazine capacity. That is why this is one of the first things for a shotgun owner to improve when he starts building his tactical / home defense Remington 870 shotgun.
A lot of Remington 870 owners want to install a magazine extension on their shotguns. But there are dimples in magazine tube which must be removed first. And all of us are afraid to break our favorite shotgun during this process.
What is the purpose of the dimples inside the Remington 870 magazine tube?
I have received answer about dimples directly from the Remington:
“The dimples in the magazine tube is to keep the new style retainer in place. If the
dimples are removed, the retainer would not stay in place. We do not recommend these
dimples to be removed. This style was introduced in the late 80’s.”
But if you want to install magazine extension you still need to drill them out first.
Dimples were not in magazine tube forever, Remington started to punch them into magazine since 1990 or little later. There are no dimples in Police version of Remington 870 (standard Remington 870 Express magazine capaciy is 4+1, or the one with factory magazine extension is 6+1, but it has dimples too)
Some owners say that drilling them out leads to rusting of your magazine tube so you may find it useful to cold blue it.
How to install magazine extension on a Remington 870 shotgun
If you own a Remington 870 pump action shotgun then you will probably want to install a magazine extension at some point in order to hold more ammunition. The only problem is you have to remove the dimples that are in the magazine tube first before you can install the extension. Many shotgun owners are afraid of this process because they risk breaking their weapons when trying to remove these dimples. That is why if you are a total newbie to modifying shotguns yourself then you should have a professional do it for you. Otherwise, take it one step at a time.
First, you want to make sure you have a magazine extension that is made exclusively for the Remington 870. There are extensions available that hold 1 to 4 and even more rounds of extra ammunition.
There are many different extensions on the market today:
1. TacStar Magazine Extension
2. Choate Magazine Extension
3. Nordic Components Magazine Tube Extension
4. Original Remington Magazine Extension
5. Scattergun Technology Magazine Extension
6. Vang Comp Systems Magazine Extension
Attention: Manufacturers of extensions consider that the standard capacity of the Remington 870 Express shotgun is 5 rounds (4+1), that is why when you want to buy magazine extension for 2 rounds, you need to choose the 7-shot magazine extension.
Instructions on installation of the magazine extension on Remington 870 Express
If you have standard 4+1 Remington 870 Express shotgun (or even the one with factory +2 extension) the process will be longer than on Remington 870 Police which doesn’t have dimples in magazine tube. Remington 870 Police shotguns with previously installed magazine extensions do not have “dimples” in magazine tube and will readily accept any magazine extension.
Sometimes there are no dimples on older Remington 870 shotguns.
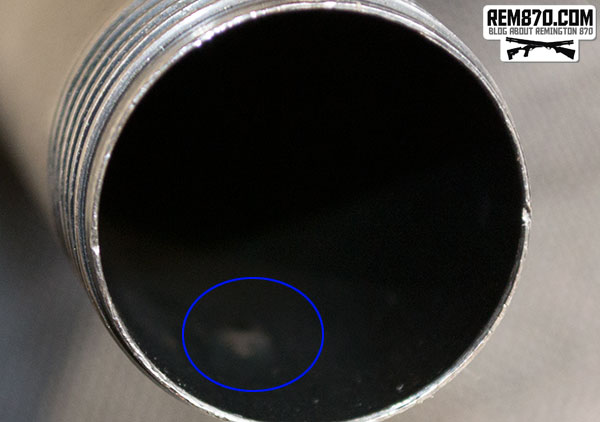
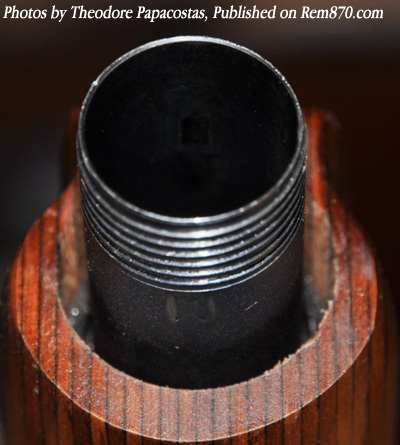
Remington 870 Express with 4+1 capacity has two dimples in magazine tube. You need to remove them for follower to go through.
When you are finally ready to install the extension, you have to go ahead and remove the dimples. There are two common methods for doing this. You can either drill out the dimples and leave small holes in their place or insert a socket into the magazine tube and then hammer it in order to press out the dimples.
There are two known methods to remove them:
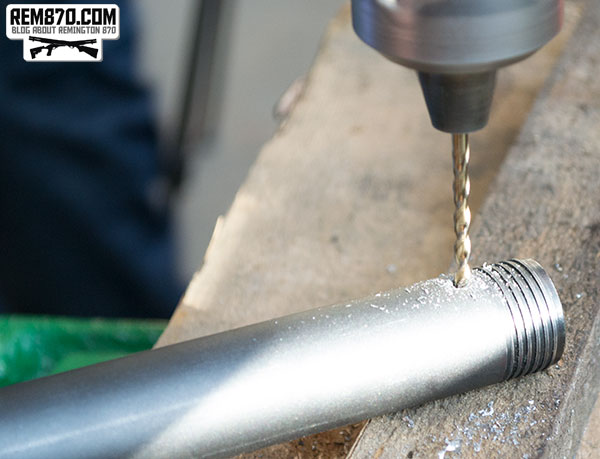
1. Drill them out using dremel tool
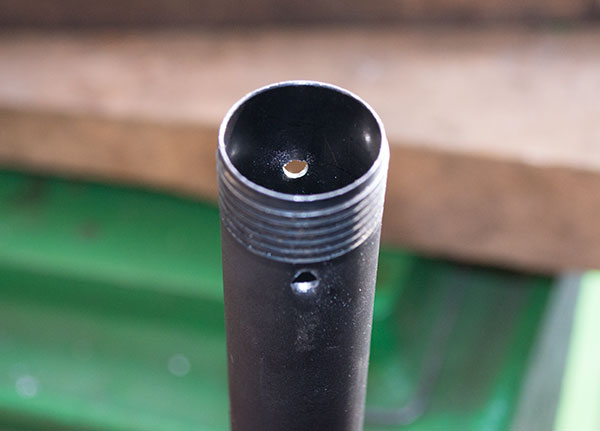
Drill out the dimples. You will have two small holes in magazine tube.
2. Socket method using 16-17mm socket.
Hammering the socket inserted in magazine tube to press out the dimples.
Both methods are good but I recommend using the drill method because sockets can get stuck in the magazine tube to the point where it is impossible to get them back out. Some people even end up purchasing new shotguns because they failed to get the socket out of the magazine tube. So your best bet is to drill the dimples using a Dremel tool or drill. This will allow you to make the holes faster while ensuring the safety of your gun. Since there are two dimples found on a Remington 870 magazine tube, this means you will be making two holes. Now you will be able to install the magazine extension with no problems.

Removing Dimples in Magazine Tube Using Hammer and Socket
I highly recommend to use the dremel method and to drill out the dimples in magazine tube. I have used both of them on my shotgun and think that diameter of the magazine tube became bigger because of the socket method. I had some problems installing magazine extensions and sling mount. Also, I’ve heard about the similar problem from another Remington 870 Express owner.
Also, I know that socket can stuck in your magazine tube, I’ve even heard that somebody couldn’t get it out of the magazine tube and ended up buying a new shotgun!
Drilling out Dimples (Tabs) to install Magazine Extension on Remington 870
My friend decided to drill out the dimples inside the magazine tube of Remington 870. It was a good chance to make photos and record video of this process. Video will be available soon.
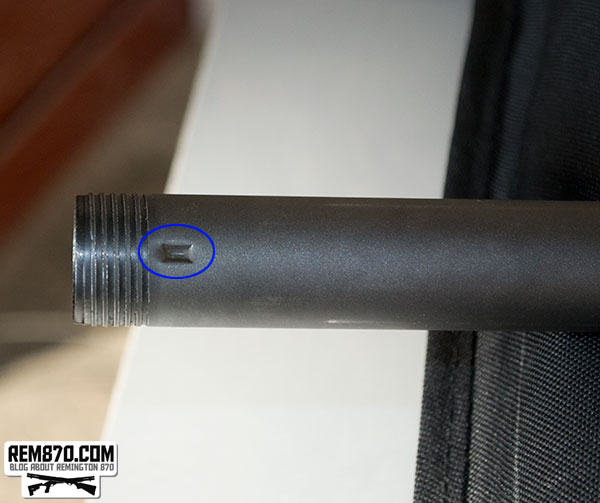
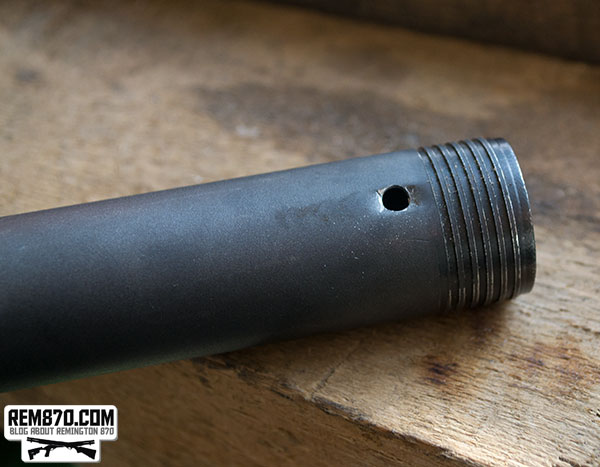
As you know, Remington 870 Express shotguns now have two dimples in the end of the magazine tube. They are made to hold the new spring retainer in place.
To install a magazine extension, you need to remove dimpes first. One of the ways to remove dimples is to drill them out. This will leave two small holes in a magazine tube.
Remington 870 Dimples in Magazine Tube
Remington 870 Dimples in Magazine Tube
Drilling Out Dimples in Magazine Tube of Remington 870
Drilled Out Dimples in Magazine Tube of Remington 870
Drilled Out Dimples in Magazine Tube of Remington 870
As you can see, you will need to spend some time polishing the holes inside of the magazine tube.
Drilling out Dimples (Tabs) to install Magazine Extension on Remington 870 Video
Dremel/drill tools are fairly inexpensive and you can pick them up for about $40 to $80 at your local hardware or home improvement store. You don’t have to be a handyman in order to learn how to operate this device. All you have to do is hold the tool in your hand and gently apply the end to the dimple in the tube. If you still have questions or doubts then you can watch YouTube video demonstrating this process for you:
Removing Dimples on Remington 870 Magazine Tube
Theodore has sent me a fantastic instruction on dimples removal. I know that many Remington 870 owners are searching for such instructions and I am happy to share it with you. Many thanks to Theodore for his work and photos.
How to Remove Dimples in Magazine Tube of the Remington 870 Shotgun:
This is Theodore, and after following your holiday poll on shotgun gift ideas, I too decided to buy myself one of the most sought after shotgun X-mas present: a +2 Rounds Magazine Extension. Being loyal to the Remington brand I purchased a original Remington +2 mag extension (SKU. 19420) which was in stock from my country’s official Remington importer.

Remington 2-Round Magazine Extension
This is a quality extension and has a great fit and I strongly recommend it. It is exactly as you describe it on your site: https://www.rem870.com/2009/09/07/original-remington-870-2-round-magazine-extension/
Recommended Product:
 Remington 870 Magazine Extensions |
Get it here: http://tinyurl.com/cm2s8zr |
The reason I was weary of installing such a product until today is because I could not find in my heart to to use a drill, dremel, or file on my gun to remove the dimples in the magazine. It gave me the impression of damaging my gun. Of course, hammering a socket inserted in the magazine tube to force out the dimples is out of the question – and should NOT be attempted. You will only damage your gun!! This site covers this topic very well.
Reading the comments from the blog, a reader named Ken posted on November 10, 2009 an alternative “dimple curing” method on the Rem870.com Blog, using a combination of the socket method and then a basic metal working method such as auto body work for a smooth final finish.
After some thought, I decided to attempt and remove the dimples from my gun without the use of a drill or dremel. I decided to modify Ken’s method above and replace the hammer and socket method of the first phase of his procedure, with a vice build to fit exactly around the inner (~23mm) and outer (~25.5mm) surface of the magazine. I initially wrapped a single layer of paper masking-tape around the outer front of the magazine tube to protect it from scratches. Tightening the vise initially flattened the dimples 80-90% of the way. You will be surprised at just how hard and strong the magazine tube metal is. You will need to apply as much pressure with the vice as you can, to make sure the dimples pop out as far as possible. Too much pressure it not enough! – just make sure your inner and outer guides fit your magazine tube flush on both the inner and outer side.
Then I could insert an oiled socket (approx 23mm diameter) which would fit snugly in the magazine tube and apply a basic metal working method such as auto body work for a smooth final finish. Make sure you have a good handle on the socket and that you can easily remove it if required. Do NOT force or hammer the socket into the magazine tube. It should fit snugly – if not, it is the wrong size. The secret is to use a metal working hammer (soft metal and light weight) and GENTLY tap on the OUTSIDE of the tube (over dimples) until the “dimples” blend in with the rest of the tube. The use of the socket in this instance in NOT to force out the dimples the remaining 10-20%, but to act as a counterbalance to the gently tapping action you are going to be applying on the outer area of the dimples and make sure that your magazine tube remains perfectly round in the process.
It really does work very well …. and you do get a perfect round finish. Done properly, the magazine will retain its finish. If not, a little gun-blue will mend any markings.
The method I describe above if done properly, results in minimal modification and no damaging of the original part. However, I think that you need to feel confident “very!!!” about how good a “handyman” you are. If not, I recommend that you use the drill or dremel method instead which always and quickly gets you the required result, every time!
Here follows some pictures, steps and parts required if you wish to try this out.

Copper Hose Nosel to make Outer Vise Guide
This is a simple 2-piece water hose connector. The reason I chose it was that it had the correct diameter required for the outer guide of my vice (~25.5mm). Copper is also a soft and easy to work with metal that won’t damage your magazine tube as it is much softer. Just cut it and retain the part you need. As long as you get the diameter right use what you find.

Copper Hose Nosel to make Outer Vise Guide
To create the inner guide of my vice I used a spanner bolt bit that was the correct diameter (~23mm) for the inner guide of my vice and also acted as a socket.

Bolt Key used to make Inner Vise Guide
After cutting it, the one piece acted as the vice guide (Note the one ended is grinded to allow it to fit in the magazine tube as initially the dimples will stop it from entering), and the other longer piece acts as your socket.

Bolt Key used to make Inner Vise Guide
This is the vise I used.

Vise
You will require some nuts & bolts.

Nuts and Bolts
This is what you are trying to make and assemble.

Parts and Assembly
This is how you need to assemble your vice. Note the inner guide is grinded down on the bottom end so that it will initially fit into your magazine tube over dimples.

Vise Assembly
This is everything you will need to remove dimples in Remington 870 magazine tube:

All Required Items to Remove Dimples in Magazine Tube of Remington 870
Prepare your magazine tube for the procedure. The paper tape protects the tube from any markings and allows for a nice tight fit – no slack. It is very important to mark the areas you are going to be working on.

Magazine Tube Preparation Markings
Insert the vice and apply as much pressure as you can. If your inner & outer vice guides are the correct size, there is no way you can damage the tube. Be sure you carefully align the application of pressure exactly on the dimple. This should pop 80-90% of the dimple out. Apply on both dimples.

Vise Application
Now you can insert the socket and gently start tapping out the remaining dimple. The secret is to use a metal working hammer (soft metal and light weight).

Socket Metal Work
You end up with the dimples completely remove. If you insert your finger you will not be able to feel them at all.

Unblued Finished Tube Inside (after dimples removal)
Gun Blue the area where the dimples used to be – inside & outside.
Blued Finished Tube Inside
Even though the inside of the tube has no dimples, you will still be able to see a mark on the outer side of your magazine tube created by the factory punch.

Blued Finished Tube Outside
Finished Product. I am very happy with my Remington +2 Rounds Magazine Extension. It really looks sexy.

Mounted Magazine Extension
I never added the original Remington magazine clamps as it is much easier to clean and service your weapon without it on. Furthermore, the clamp is such a tight fit that it will scar your barrel and magazine extension. The magazine extension is such a sturdy fit that you also don’t need it – apart for mounting a sling. Therefore, I am planning to use a front and endplate sling mount instead (many manufactures to choose from, I’ll keep you posted).
Having successfully cured my “dimple problem” I am extremely happy with my original Remington upgrade, knowing that my magazine tube has retained its factory finish with no visible modifications.
Special thanks to Ken who started me on this idea. Also, thanks Vitaly for providing a platform where we can learn from each other and exchange ideas.
Best Regards,
Theodore
Recommended Products:
|
Remington 870 Magazine Extensions |
Get Remington 870 Magazine Extensions here: http://tinyurl.com/cm2s8zr |
 Remington 870 Magazine Tube Dent Raiser |
Get Remington 870 Magazine Tube Dent Raiser here: http://tinyurl.com/a24ffvw |
How to Remove Dimples From Remington 870 Express Magazine Tube
Dimples removal from Remington 870 magazine tube is one of the most popular questions. Every Remington 870 shotgun owner which decided to install a magazine extension faces the problem of dimples removal. I have already posted some posts about this problem earlier. Also, readers of the Rem 870 blog have sent me their instructions, photos and ways to remove dimples in magazine tube.

Remington 870 Shotgun with Magazine Extension
I checked my remington 870 to be sure it is unloaded and safe. Then I have taken it apart… the last steps was performed in my hobby room… my garage : – )
I used a 25,5 mm inner diameter cutted tube in order to prevent damages to the external surface of the shell magazine tube that is fixed to the body of the remington 870.

Tube protects external surface of a magazine
After this I took L wrench or tube wrench (like we call it in italy) and smashed dimples inside the magazine tube with a hammer.

Smashing out dimples with wrench
After doing that, when I tried to put back the muzzle, i realized that the magazine tube external surface went deformed a bit. So i had to press it a bit to put the gun toghether again easily like before the procedure of dimples removal.
After this I can tell to all the guys that are trying to do this…. you have to be very careful and gentle whith the hammer and you will be luckier than me. At that point i used my dremel with a tool on it to file the inner tube exceeding material without creating holes in the magazine tube.

Dimples Removal using a Dremel
After the removal of the exceeding material you will have enough space for the aftermarket follower (i used a scattergun technology green follower) and for the longer spring that you’ll have to use with the extended (+2) magazine tube.

Scattergun Technologies High Visibility Follower Remington 870
The inner surface of the magazine tube, preaviusly worked by the dremel, was cleaned and smoothered by sandpaper mounted on the dremel tool…

Dimples Removal using Dremel
After all that work I assembled the gun and finally, using a T-wrench or a tool made by myself like the one you will see on my photos, i mounted the longer spring and the extended magazine tube on the remington 870.

Mounting Long Spring
At the end ,after using some dummy shells inside the shell magazine to test it, I wanted to check if the dismanteling and put toghether procedure was easy like before. All that worked but I found out that the extended magazine tube was stuck in the Remington oem magazine tube thread. I had to use a wrench to unscrew it and this isnn’t a good option while you’re on the field.
Aat that point I have found a method that will be more useful when you need to take apart a shotgun on the field. I made two 4mm holes in the extended magazine tube, so in that way you will be able to screw-unscrew it using an allen wrench or a similar tool that you surely will have in your field-bag.

Holes in the magazine tube
I hope it will be helpful for some guys…
Gunsmith Level Tool for Remington 870 Magazine Dimples Removal
As you know, new Remington 870 shotguns come with two dimples inside of the magazine tube. To install a magazine extension you need to remove them. Follower will simply stuck if you don’t do that.
I found out about new tool for dimples removal today: Brownells Magazine Tube Dent Raiser. It is rather expensive but very effective. I think it will be good for gunsmiths which remove dimples in magazine tube often.
Not sure that somebody is goig to pay a $82.99 for one time use, maybe only if he owns several shotguns.
Remington 870 Magazine Tube Dent Raiser |
Get Remington 870 Magazine Tube Dent Raiser here: http://tinyurl.com/a24ffvw |
Related Posts:

Good job Theodore, Enough is good, more is better! Did you try to find a +3 or were you set on a +2 mag extension? A mag clamp is definitely recommended, Rem’s mag tubes are strong but will bend or brake on accidental impact and they tend to loosen up while firing. How do you like that red dot sight (NC star?)
Take care, J.R.
I really think you over thought this. Its a much simpler job than you put it out to be.
1. File dimples completely down with a half round metal file.
2. Blue the unprotected metal.
It works great and doesn’t leave holes in your magazine tube.
This is not overthinking it… its called not being lazy and caring about your gun
Mr. Brown, “File dimples completely down with a half round metal file It works great and doesn’t leave holes in your magazine tube.” how is that possible? If you file the dimples down you will have holes.
Pingback: How to Remove Dimples From Remington 870 Express Magazine Tube | Rem870.com
Pingback: help with my remington 870.
Or you could take the tube to an auto body shop that does “paintless dent repair” They have lots of unique tools.
What kind of vice is that? I’ve looked at a bunch of c-clamps and can’t find anything like that.
Hello, can anybody identify the c clamp/vise shown in Theo’s pictures?? I have been unable to locate any that are made with a flat body shown. Help in sourcing would be greatly appreciated – Thanks, Sam
I wouldn’t have thought about using the paper to protect the tube and do those markings so I actually know where I should be working on. I think I would have messed up the tube if I didn’t see these images, so thank you for stopping me! I will also be using original Remington 2-round magazine extension because it’s the best.
I can’t believe that some people are still trying to hammer the socket inserted in the magazine tube to force out the dimples! This will clearly damage the gun, sometimes beyond repair. I know of someone that couldn’t even use the gun after he did this, so don’t try it! I think Dremel is the best option because it’s safe and not as intrusive on the gun.
This article was a great help. I completed the same basic process with some simplifications. I used a spark plug socket that I ground on one side to slip past the dimples. I used that socket for both the “vise” process and the final pounding out of dimples. I used a $1.59 c-clamp from Harbor Freight as the “vise.” I had to grind it a bit to fit inside the socket. Then to do the final pound-out I used a large punch rather than direct pounding with a hammer. And rather than a metal ring around the outside I used a piece of 1″ inside diameter (1 1/4″ OD, I think) PVC pipe… the outer ring is just to keep the clamp from messing up the tube so it doesn’t need to be metal.
Like Rick suggested no need to cut the socket in half you just need to grind one side socket to get past dimple. Also if you use a long enough bolt you could instead of pounding out the remaining 10% of dimple out with a hammer you could use a second larger diameter socket on the outside top of tube but shorter and after getting the inner socket past remaining dimples and once past dimple then turning it a quarter turn, then you place larger socket over bolt with another nut/washer and tightened the the outer nut with a wrench pulling the inner socket out forcing remaining dimples out and not causing any stress on brazed tube end connected to receiver.
I just drilled mine out and then polished the inside to remove any burrs. That was 12 years ago and I’ve not had any problems with feeding whatsoever.
Hey Eddie. You have a problem with dirt getting in the tube?
If you get rid of the dimples can you still use the gun with out the extension. My 870 is dual purpose I hunt ducks on the weekend and then plan to re-rig it for home defense during the week. I would like to add a mag extension but if it will not function normally without the extension and without the dimples I will just do without.
Yes, but you should get one of the old style magazine spring retainers (about $6 at Brownells) and a set of smooth jaw channel locks (model #415) to install it. You can pry it back out with a flat blade screwdriver when you want to switch to the mag extension again. The stock quarter-turn mount retainer will no longer dog up on those dimples to hold the spring in with the magazine cap removed.
Note that it would still “function” even without the old style retainer, but it would risk the follower and spring falling out if the screw on cap falls off or is removed in the field (to, say, change barrels) without a retainer in place.
I have been using a swage from Brownells to flatten the dimples. I’ve done about a dozen shotguns so far. It only takes a few minutes, put some grease on the swage and drive it in, tap the outside lightly with a hammer.. Here’s Brownells part number and description, 006-000-119 Magazine Tube Detent Swage-Remington 12 Gauge. It costs about $35.
YES!! Super helpful Thank you, James!
Hi guys. I have a delima. I bought a 12 gauge shotgun remington model 870. I was told that it was a 3 shot. Heres the problem. The bottom magazine tube doesnt have a opening for the shells to go in. In fact when I put thw shell in from the bottom since theres no opening I try to put it in the top barrel but it dont fit. Now ive been reading that you could put an exctintion on it but since the bottom magazine tube is blocked off how do I do that? I was gonna by the bottom magazine tube but its one piece with the part that the shell goes in the bottom & side where the shell flys out its all one piece. So basically I think its a one shot & the exctintion wont work cuz the magazine tube doesnt have a opening in it. Help plz.
Whatever u do DONT put vise grips, channellocks, or pliers on any part of the tube other then the solid end to remove it as it will crimp and if u think a dimple is hard to remove try removing 2 flat spots. ps if anyone has a 20″ Maverick 88/mossberg I live in Linwood NC. Thanks Signed yes ima dumbass.